A GUI is a graphical (rather than purely textual) user interface to a computer. Why is GUI necessary? Well,the term was coined because the early interactive user interfaces to the computer were not graphical but merely text oriented. This was highly cumbersome as you had to remember all the commands and the response of the computer was infamous as well. Majority of today's operating systems come with a graphical user interface. Applications typically use elements of the GUI that come with the operating system and add their own graphical user interface elements.
In netbeans,GUI design takes place in the IDE workspace. The tools present in IDE's java GUI tools include
1) GUI Builder
2) Inspector Window
3) Palette Window
4) Properties Window
5) Connection Wizard
6) Palette Manager
Instead of getting down to theoritical aspects of the GUI, I prefer to explain the method of implemeting this concept in netbeans by creating a project. Our project is to create a calculator.
i) Click on File-> New Project-> Java(in categories)-> Java Application(in projects). After doing this, click next.
ii) Give project name as Calculate and while doing so,ensure the following important points.
(a) Select "set as main project" .
(b) Deselect "create main class" if it is selected.
iii) Click Finish.
iv) In projects window, right click Calculate and select new->Jframe form.
Give
(a)class name: CalculateUI
(b) package : my.calculateThen click finish.
v) Next,we use the Palette to create to create the layout of our calculator. To use the options present in the palette,select a JPanel from the Palette and drop it onto the JFrame. In our design of the calculator, we use four jLabels, four jTextFields and eight jButtons. After dragging and dropping all of these on to the jFrame,our screen should look similar to the one shown below. If you do not clearly understand how to use GUI builder,the following webpage might come in handy. Do check this out.
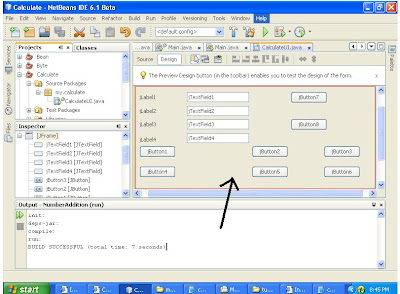
Here,I have just enlarged the photo to aid better understanding.

vi) Now,we rename every display text component added on to the jFrame window. To do this, double click on every component and rename. The screenshot after doing so will be as shown below.
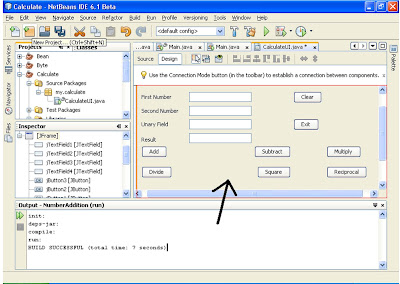
Just to make the photo more clearer,I have added an enlarged version of the photo. Hope it helps..!

Here it is important to observe that basic arithmetic operations can be performed on two operands wgich is indicated by 'First Number' and 'Second Number'. 'Unary field' is used when an operation is to be performed on a single number.
vii) After renaming is done,we need to add functionality to every component of the calculator. Let us start with the EXIT button. To add functionality,right click on the exit button and choose action and select action performed. The IDE will then open up the Source Code window. Now, scroll to where you implement the action you want the button to do when the button is pressed. Your source code window contains the following statement.
private void jButton3ActionPerformed(java.awt.event.ActionEvent evt)
{ //TODO: Add your handling code here :
}
We add one line to exit and our final code looks as shown below. Similarly,one should follow the same procedure for adding functionality to different buttons and the codes for all buttons are as shown below.
I) EXIT Button
private void jButton3ActionPerformed(java.awt.event.ActionEvent evt)
{
    System. exit(0);
}
II) SQUARE button:
private void jButton5ActionPerformed(java.awt.event.ActionEvent evt)
{
    float num,result;

    num=Float.parseFloat(jTextField3.getText());
    result=num*num;
    jTextField4.setText(String.valueOf(result));
}
III) MULTIPLY Button:
private void jButton3ActionPerformed(java.awt.event.ActionEvent evt)
{
     float x1,x2,result;

     x1=Float.parseFloat(jTextField1.getText());
     x2=Float.parseFloat(jTextField2.getText());
     result = x1*x2;
     jTextField4.setText(String.valueOf(result));
}
IV) ADD Button:private void jButton1ActionPerformed(java.awt.event.ActionEvent evt)
{
float x1,x2,result;
x1=Float.parseFloat(jTextField1.getText());
x2=Float.parseFloat(jTextField2.getText());
result = x1+x2;
jTextField4.setText(String.valueOf(result));
}
V) DIVIDE Button:
private void jButton4ActionPerformed(java.awt.event.ActionEvent evt)
{
    float x1,x2,result;
    x1=Float.parseFloat(jTextField1.getText());
    x2=Float.parseFloat(jTextField2.getText());
    result = x1/x2;
    jTextField4.setText(String.valueOf(result));

}
VI) RECIPROCAL Button:
private void jButton6ActionPerformed(java.awt.event.ActionEvent evt)
{
    float num,result;
    num=Float.parseFloat(jTextField3.getText());
    result = 1/num;
    jTextField4.setText(String.valueOf(result));
}
VII) SUBTRACT Button:
private void jButton2ActionPerformed(java.awt.event.ActionEvent evt)
{
    float x1,x2,result;
    x1=Float.parseFloat(jTextField1.getText());
    x2=Float.parseFloat(jTextField2.getText());
    result = (x1-x2);
    jTextField4.setText(String.valueOf(result));
}
VIII) CLEAR Button:private void jButton7ActionPerformed(java.awt.event.ActionEvent evt)
{
jTextField1.setText("");
jTextField2.setText("");
jTextField3.setText("");
jTextField4.setText(" ");
}
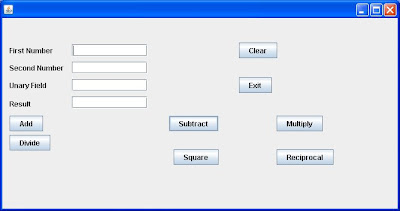
Its mission accomplished! Our calculator looks as shown below.
To compile build/compile the project, click on build->build main project.Then to run the main project, click on run-> run main project. When you do this, you can make calculations in this calculator! :)


